
You are currently browsing the category archive for the ‘dyeing’ category.
When so much time has passed since having time to blog, where do you start? From now, and the rest will come, if they may. So, here’s what we did last week with R, an idea I ‘ve wanted to try for a while, but somehow other weekend plans always came first.
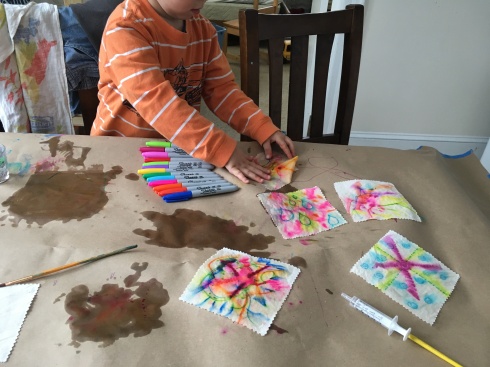
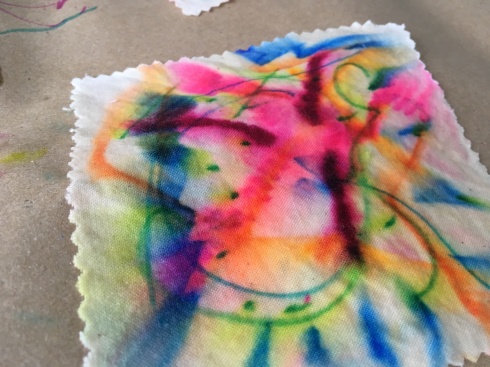
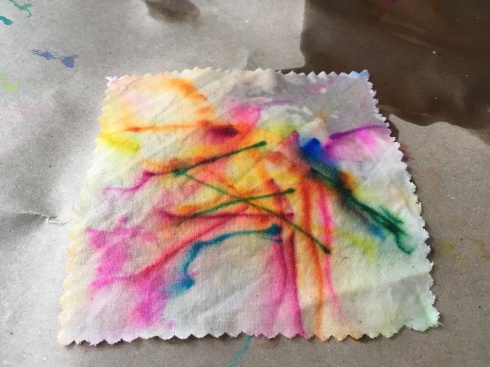
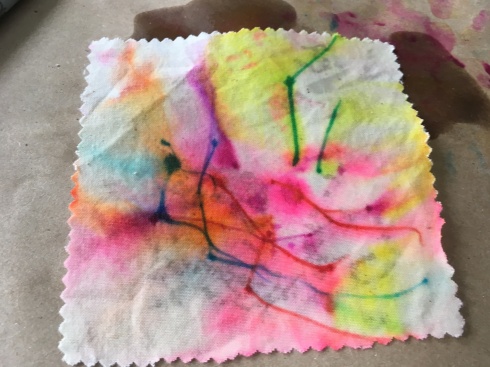
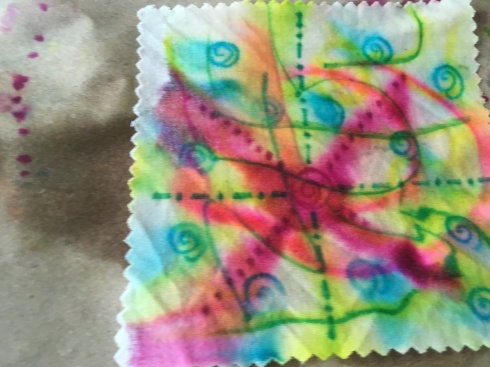
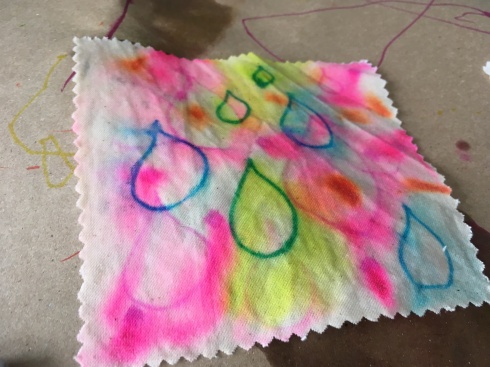
I grabbed some of my trusted off-white linen pieces of fabric (I have tons of it!) that I had pre-cut for making coasters, lay a piece of paper on the kitchen table and took out mommy’s markers, that include sharpies. Initially I made some geometric pattern markings, and some rain drops, but after I saw how R’s abstract lines came out, I copied him and we came up with a bunch of very colorful results. I also started trying to use a syringe to drop the alcohol, but once again his style of just dumping it on top was more fun.
We both enjoyed the process, even if the smell made us a little giddy, and the end result was almost what I expected or hoped to get. I think I ‘d prefer to try this in a less porous surface, perhaps glass or tile or a ceramic bowl, as the color didn’t spread as much on the fabric.
Now for setting the color with some hot iron and deciding what to do with them. Coasters, again? Haphazardly applique them on some fabric and make a bag? Add them as embellishments to the boys’ clothes? Only time, and inspiration will tell. For now, I am satisfied.

 I know, I know, Easter is over. But our Easter was just yesterday, and as always I left it to the last minute, but I did dye some eggs! It was so easy but so much fun, and I liked the end result so much that I decided to write about it anyway.
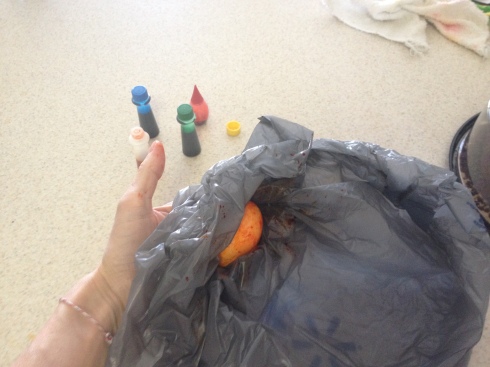
To make these marbled eggs I used:
- white eggs
- food coloring
- plastic bags
- tongs (optional)
Here’s how you do it:
- Lay a boiled white egg on a plastic bag and drop a few drops of food coloring directly onto the egg. I started with 3 or 4 of one color.
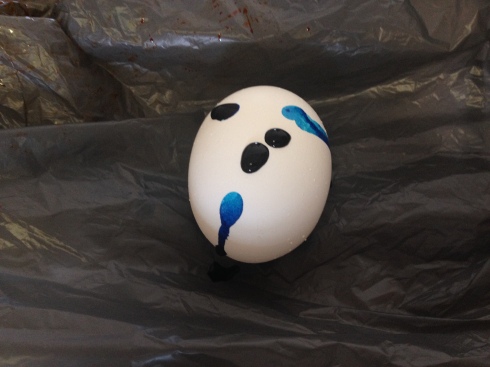
- Using the plastic bag to hold the egg and contain the food coloring, roll, tap, scrunch, rub or use any other technique that comes to mind to spread the color onto the egg. The plastic bag will create a marbled effect, and each technique gives a different result. Take your time to experiment with each.
- Move the egg to a different (clean) part of the bag, or an entirely different bag, and repeat the process to cover the rest of the egg. If you use a different part of the same bag you can take advantage of the blend of the two colors, which will inevitably happen.

- Leave the eggs to dry on another plastic bag – this will prevent them from rolling onto each other.
- That’s it! Wait till all paint is dry and enjoy!


All week long, since I saw this great tutorial for kids-friendly batik with glue by That artist woman, I have been thinking about making something like that myself. Friday after work was the only time I could make the trip to the closest craft store. I stocked up on brushes and glue, and bought some acrylic craft paint. I already have lots of fabric paint, but for the bulk of the fabrics I thought something cheaper will take away the fear of messing up.
Last night I made my glue design and left it overnight to dry.

Painting over the fabric was a new experience for me. I haven’t played with colors much ever since I was a kid, and it took me a while to figure out what I want to do with them.

My first try wasn’t as sophisticated as I would have liked it, but it was incredibly fun, and my impatience over rinsing out the glue turned out good, because it cleared off some of the excess color from the fabric, which I like.

After I was done, I was nowhere near ready to stop playing with the colors and brushes. There was plenty of fabric (IKEA white roll, I think it was sold as a cheap sheet), colors, and of course wax paper – very important to avoid ruining your work surface below. The colors bled immediately, as the fabric was so thin.


I made a couple of pillow tops, which I am very happy with. I had yet more color mixed after I was done, so I played a little with some smaller pieces of fabric, that will probably end up as zippered pouches. I am still tentative with my painting, but I am enjoying myself very much, and I know that the more I do it the better I will get in both ideas and execution.
Disclaimer: some of the posts are outdated. During the week I do things, I take pictures as I do them, but writing about them may have to wait a while. This was certainly the case with this little project.
I have been wanting to try self-striping dyeing for a long time, thinking about it and scheming. heh. I have lots of white wool that begs to be tested, and this time I decided to play with three wide stripes of blue and green for a pair of indoors socks. They will have to be indoors, as the yarn is baby wool, and won’t survive regular use.
I started by dividing the yarn into three large sections. Using my newly-acquired swift I brought from home. It belonged to one of my late aunts, and I am so happy to find that it survived the rushed clearing of her possessions. I remember her joy and pride, showing it to me when she first bought it, and will always think of her this way when I see it.

I made one section, moved it to the center of the swift and made the rest. Moving it to the cente was essential, as when I put the first section outside the swift on the floor, I got this:
 oops!
oops!
And here is where the title of this post comes in: why does the expression ‘reinventing the wheel’ have such bad connotations? I am sure that this trick is well-known to those who have used swifts before. Of course, I didn’t know about it at first. But when I did discover the solution to this little problem, I felt so happy! What’s wrong with reinventing the wheel, if it gives one such a thrill? In fact, I liked it so much, I hope I reinvent many more wheels! Hurrah for cheap thrills!
… anyway… After all sections were sorted and tied up with little rugs, in it went to warm water for about 20 minutes. Another little experiment I did (as these would be my learning dye socks) was using some pieces of fabric that I knew would bleed heavily. I wanted to make little specks of colour along the sock, like little dots here and there (another case of wheel-reinventing? Perhaps.)

Then, I put each section of the yarn in jars, filled with colour. No picture of this stage, unfortunately. I had to wear gloves as my fingers turned blue very quickly without them (what was I thinking?), and there just was no right moment to take them off and take pictures.
I used RIT dye, two different colours plain and one mixed. The whole process was finished very quickly, no stirring, no boiling, and I let the yarn in for no longer than 5 minutes. I know from past experience that this yarn takes up the colours really fast.
After scalding my fingers squeezing the excess water off the yarn, I rinsed it ’til it called for mercy (o.k., ’til the water run clear), and then let it drip and dry on my favourite instrument for this job: a broomstick. Over the tub (doors closed so kitties won’t end up with blue tongues to match my fingers).

I am very pleased with the end result.
 Ying and Yang sock yarn


